
Earlier this year, I posted a tutorial for how to auto-post content on Facebook. Many of the details are no longer valid due to changes in Facebook’s API - namely how access tokens are handled. Here, I recreate the tutorial using current best practices.
If you have a personal blog, it is only natural that you want to share your work with others. If you use blogging software, such as WordPress, then chances are plugins already exist that will automatically share your content. If like me, however, you use a static blogging engine - or simply like to tinker - then you will need to create your own sharing tool.
I use Second Crack as my blogging engine, which has the ability to execute post-publication hooks. I created two such hooks, one for Twitter and one for Facebook. I will focus on how to auto-post on Facebook. The method aims to be sufficiently generic so that you can adapt it to your own particular needs. The process consists of three main steps: creating an app on Facebook, obtaining proper credentials, and using those credentials to post on Facebook.
Creating a Facebook App
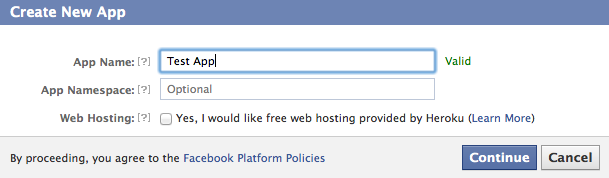
To auto-post on Facebook, you must first create an app. Go to the Facebook Developer site to begin. Click on the “Create New App” button in the top right corner. You will be presented with the following prompt. Enter a name for your app and continue.
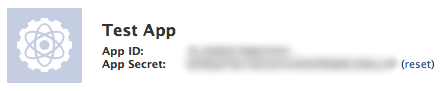
Next, you will be presented with a form to customize the app. The header gives important details about your app’s credentials. Write down the App ID and App Secret as you will need them later.
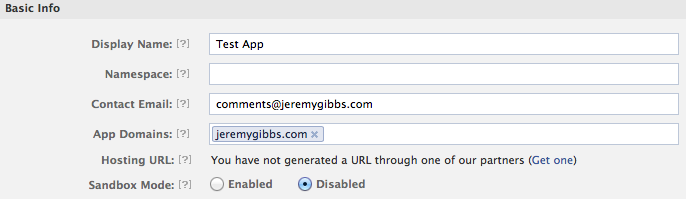
Next, in the Basic Info section, add your email address and the domain from which you will be posting. Below is how mine looked.
Finally, you have to declare how the app integrates with Facebook. In my case, and likely yours, content is posted from a website. Choose the website option and enter the URL of your site. Again, here is how mine looked.

Save the changes. You have now successfully created an app on Facebook.
Obtaining Credentials
Now that you have created the app, you’ll want to use it for sharing content on Facebook from your site. To do this, you need to authorize the app to post on your behalf. Generally after an app has been authorized, the user must be logged into Facebook in order to verify permissions. We can avoid this by requesting a long-term authorization token. The token is then accepted by Facebook as an alternative to an active session.
To authorize the app, you will make a simple php webpage. Create a file named fb_tokens.php, enter the following code, and then upload it to your site. I will briefly describe the code below.:
<?php
//-- App information --//
$app_id     = "Your App ID";
$app_secret = "Your App Secret";
$my_url     = "http://yourdomain.com/fb_tokens.php";

//-- Start a session --//
session_start();

//-- Check if short-term code exists --//
$code = $_REQUEST["code"];

//-- Redirect to Facebook if the user has not yet granted permission --//
if(empty($code))
{
  //-- CSRF protection --//
  $_SESSION['state'] = md5(uniqid(rand(), TRUE));

  //-- URL to request permission --//
  $dialog_url = "https://www.facebook.com/dialog/oauth?client_id="
  . $app_id . "&redirect_uri=" . urlencode($my_url) . "&state="
  . $_SESSION['state'] . "&scope=publish_actions";
  echo("<script> top.location.href='" . $dialog_url . "'</script>");
}

//-- This grabs redirect info if the user has granted permission --//
if($_SESSION['state'] && ($_SESSION['state'] === $_REQUEST['state']))
{
  //-- URL to request long-term (60 days) access token --//
  $token_url = "https://graph.facebook.com/oauth/access_token?"
  . "client_id=" . $app_id . "&redirect_uri=" . urlencode($my_url)
  . "&client_secret=" . $app_secret . "&code=" . $code;
  //-- This grabs the long-term token and expiration time (in seconds) --//
  $response = file_get_contents($token_url);
  $params = null;
  parse_str($response, $params);
  $_SESSION['access_token'] = $params['access_token'];
  $_SESSION['expires']      = $params['expires'];

  //-- Print access token and expiration date --//
  echo 'Token: '. $_SESSION['access_token'] .'<br>';
  $expireDate = time() + $_SESSION['expires'];
  echo 'Expiration: '. date('Y-m-d', $expireDate) .'<br>';

  //-- Store access token and expiration date in database --//
  $mysql_host     = "Your Host Name";
  $mysql_user     = "Your User Name";
  $mysql_password = "Your Password";
  $mysql_db       = "Your DB name";
  $mysql_table    = "Your Table";
  if (!$mysql_link = mysql_connect($mysql_host, $mysql_user, $mysql_password))
  {
    echo 'Could not connect to mysql';
    exit;
  }
  if (!mysql_select_db($mysql_db, $mysql_link))
  {
    echo 'Could not select database';
    exit;
  }
  $query = "INSERT INTO $mysql_table (token, expire) VALUES (\"".$_SESSION['access_token']."\",\"$expireDate\")";
  if (!mysql_query($query,$mysql_link))
  {
    echo 'Error: ' .mysql_error();
    exit;
  }
  echo "Stored token and expiration date in database"
}
else
{
  echo("The state does not match. You may be a victim of CSRF.");
}
?>
Note: Instead of simply writing down the authorization code, you may opt to store the token and its expiration date in a simple database. I will show how storing this information in a database is useful. The procedure is entirely optional, but I have included it as an example.
This is the code I used to create the database:
CREATE TABLE facebook
(
    id        INT           NOT NULL  AUTO_INCREMENT,
    token    TEXT       NOT NULL,
    expire    BIGINT        NOT NULL,

    PRIMARY KEY (id)
) ENGINE=InnoDB;
Visit the page in your browser1. The webpage script is simple - here’s how it works.
First you provide information specific to your app. Next, a session is started and the script determines whether you have granted permission to the app.2 If permission hasn’t yet been granted, you are forwarded to Facebook to do so. Once you are done, Facebook will send you back to your webpage with authorization information - a long-term access token and its expiration time (as of this posting, the long-term tokens are valid for 60 days). If you have previously granted permission, the webpage will just print the information without sending you to Facebook.
Save the token and put it with your App ID and App Secret. Make a note of the expiration date because you will have to reauthorize the app once the token expires.
You now have obtained all of the necessary credentials to post on Facebook.
Posting To Facebook
First, you will need to download the free Facebook PHP API and place it in the same directory as your app. Now that you have created an app with sufficient privileges, posting to Facebook from your site is easy. Here is an example:
<?php
//-- Grab access token and expiration date in database --//
$mysql_host     = "Your Host Name";
$mysql_user     = "Your User Name";
$mysql_password = "Your Password";
$mysql_db       = "Your DB name";
$mysql_table    = "Your Table";
if (!$mysql_link = mysql_connect($mysql_host, $mysql_user, $mysql_password))
{
  echo 'Could not connect to mysql';
  exit;
}
if (!mysql_select_db($mysql_db, $mysql_link))
{
  echo 'Could not select database';
  exit;
}
$query  = "SELECT * from $mysql_table ORDER BY id DESC LIMIT 1";
$result = mysql_query($query,$mysql_link);
$row    = mysql_fetch_array($result);
$token  = $row['token'];
$expire = $row['expire'];

//-- If expiration date has passed, give error requesting renewal --//
if ($expire < time())
{
  error_log("Facebook access token is expired, please reauthorize");
  exit;
}

//-- Facebook API --//
require_once 'facebook-php-sdk/src/facebook.php';

//-- App information --//
$app_id     = 'Your App ID';
$app_secret = 'Your App Secret';

//-- Create Facebook instance --//
$facebook = new Facebook(array(
    'appId' => $app_id,
    'secret' => $app_secret,
    'cookie' => true
));

//-- Customizable options to send Facebook --//
$post =  array(
    'access_token' => $token,
    'message' => 'This auto-post thinks that Jeremy Gibbs is a handsome lad!');

//-- Send post to Facebook --//
$res = $facebook->api('/me/feed', 'POST', $post);
?>
Notice that I pulled the expiration date and token from the database. This is useful for a couple of reasons. First, I don’t have my authorization token written explicitly on any page. Second, I can do a dynamic check of whether the expiration date has passed, which will prevent a faulty API call.
Reminder To Reauthorize Your App
If like me, you have a horrible memory when it comes to mundane tasks, the limited lifetime of the Facebook long-term authorization tokens presents a problem. I decided to setup an automated reminder. You could just as easily place the expiration date that was printed on your authorization page into a calendar. For me, I am just as likely to never check my calendar.
This is another area where storing the token information came in handy. To automate the reminder, I wrote a simple php script (fb_token_remind.php) that emails a reminder to me when the token expiration date is within 24 hours.
<?php
//-- Grab access token and expiration date in database --//
$mysql_host     = "Your Host Name";
$mysql_user     = "Your User Name";
$mysql_password = "Your Password";
$mysql_db       = "Your DB name";
$mysql_table    = "Your Table";
if (!$mysql_link = mysql_connect($mysql_host, $mysql_user, $mysql_password))
{
  echo 'Could not connect to mysql';
  exit;
}
if (!mysql_select_db($mysql_db, $mysql_link))
{
  echo 'Could not select database';
  exit;
}
$query  = "SELECT * from $mysql_table ORDER BY id DESC LIMIT 1";
$result = mysql_query($query,$mysql_link);
$row    = mysql_fetch_array($result);
$token  = $row['token'];
$expire = $row['expire'];
$humanD = date('Y-m-d', $expire);
$humanH = date('H:i:s T', $expire);
$humanT = $humanD ." at ". $humanH;

//-- Email a renewal reminder if expiration is within 24 hours --//
if ($expire-86400 < time())
{
  //-- Email details --//
  $to      = 'you@yourdomain.com';
  $subject = 'Facebook Access Token';
  $message = "Your Facebook access token will expire in the next 24 hours.\r\n";
  $message .= "Expiration time: $humanT \r\n";
  $message .= "Remember to rerun your token authorization script after this time";
  $message = wordwrap($message, 70, "\r\n");
  $headers = 'From: you@yourdomain.com';

  //-- Send the email --//
  mail($to, $subject, $message, $headers);
  error_log("Emailed reminder about Facebook access tokens");
}
?>
To automate the script, submit it to your crontab using crontab -e. Here is what my crontab looked like:
0 0 * * * /path/to/php /path/to/fb_token_remind.php
This executes the reminder script at midnight every day.
Summary
I have shown you how to create a tool suitable for auto-posting to Facebook. You created an app, granted it permission, obtained all required credentials, which you then used to post content. The creation steps are only required once. The authorization steps must be rerun every 60 days, if you remove permission from the app, or change your password. I also showed how you can store the token and expiration information to prevent faulty API calls. I also showed how you can automate a reminder for reauthorization using the expiration information.
Using these steps, you can easily customize when, where, and how content is posted to Facebook.
If you enjoyed this tutorial or have any questions, feel free to tell your friends, contact me via email, or follow me on Twitter.
-
It is important that this page be located on the server that you specified when creating the app. So if you chose http://yourdomain.com, then the page should be somewhere like http://yourdomain.com/fb_authorize.php. ↩︎
-
Here, I have only requested permission to publish content on my stream. See here for a complete list of available permissions. ↩︎